


3 Amazing Methods To Achieve Defined Curls at Home
Defined curls are currently a popular trend, with many people seeking to achieve this captivating look to enhance their beauty and overall appearance. Various techniques are employed to attain stunning, well-defined curls. Let's explore some of these methods in more detail below:
Method 1: Overnight Curls Method - For Type 2 and Type 3 Hair Look

The overnight curls method enables you to stop wasting your time curling your hair with rods or curling iron to get salon-worthy curls. For the busy fashion enthusiast, this method of overnight curling is beneficial, not to mention stress-free. This method is suitable for people who want a wavy hair look.
Step 1: Tie Hair Up
When it comes to styling your hair, preparing with a or tie or satin curler is essential.

-
Start by lightly laying a tie (i.e., a tapered scarf or head wrap band) over the top of your head. Take a strand of hair from the front and secure it around the tie by bringing it up and then passing it below, under the wrap.
- Next, grab another small piece of your hair from the back and join the two pieces together when you wrap it around the tie. Continue this method in sections until you have completed the look.
- For extra curls or making a statement, you can opt to twist the ends of your hair with your fingers as you wrap it around.
This finishing touch provides your look with maximum texture and can instantly give an extra sense of elegance.
Step 2: Secure The Curls
Pull your curl up and away from your face and wrap it beneath. Make sure you use a trusty scrunchy or an elastic to secure the curl in the desired position.

You want little touches like this to keep your hairstyle holding in place for longer, refreshing times. That extra bit of hold across the whole style ensures that when you're out that night, you can stay looking your best without having to worry about hairstyle imperfection.
Step 3: Remove The Curls
When it's time to remove your curls in the next morning, proceed with caution, take off the scrunchy/ elastic carefully, and unwrap your hair from the tie you had used earlier; start at the ends of your hair and work up towards the top of your head so you don't disrupt the curls too much.

In no time, you'll have beautiful, defined curls that are all set to be enjoyed for the day. With a few simple steps, you can easily make your hair look even more appealing and stylish.
Method 2: Bantu Knot Out - For Type 3 and Type 4 Hair Look
Bantu Knot Out is a twist on the traditional and popular hairstyling technique. It might sound complicated, but the method couldn't be more straightforward.

Best suited for anyone with natural coarse or straight hair, Bantu Knot Out is the go-to solution for all your defined curly hair needs. Below, we will get into the details of worshipping Bantu Knot Out and decompress how to make your curls look just the way you desire:
Step 1: Separate Hair into Sections
Once your hair is free and clear of tangles, it is time to section off the locks into different sections. You, as the artist, have the choice to choose how many various parts; a simple 10 or 12 will do! Then, remember to apply some defined cream to get saturated hair.

Get creative and pick different sections to utilize for bigger, loose curls or a tighter, spiral curl pattern. While stylizing, make sure to keep the partings even. That way, you'll receive a nice, streamlined look in the end.
Step 2: Twist and Secure

- Start by taking a section of hair and stretching it out. After doing so, carefully twist it together in a clockwise motion.
- Once your twist is complete, take the hair and wrap it around once at the root.
- Secure this wrap in place by using a pin and repeating along the twist.
- Continue adding pins until you are sure the knot can hold, then go back and secure the pieces you've already pinned if needed.
- Finally, double-check that all your hair is tightened and neatly tucked away in its secure twist before you are done.
Step 3: Rewrap Knots After 5-7 hours

- After 5-7 hours, it's time to unwrap the sections carefully and remove the pins.
- Run your fingers through your twists and check if any knots are prohibiting the even definition of your hairstyle.
- If there aren't, then grab your favorite moisturizer and sparingly apply it to the hair.
- Ensuring that each twist is slick and shiny will encourage the curls to stay fresh and defined. Rewrap the knot once more for extra hold, and you're ready to go!
Method 3: Using Flexi Rods - For Type 3 and Type 4 Hair Look
Have you ever found yourself wondering if flexi rods are only for professional hairstylists? Then, you'll be pleasantly surprised to know that anyone can use these amazing styling tools like hair rollers on your type 3 or type 4 hair! (This method can also be used on a human hair wig)

Not only are they a great way to achieve long-lasting curls and waves, but they will also stay for days! Put down your curling iron and grab your flexi rods – with this guide, you're sure to master your new styling tool like a pro:
Step 1: Gather Your Tools

When you're ready to begin, make sure that you have all the necessary items.
- Flexi rods come in many sizes and textures, so choose a set that will fit your hair type and expected outcome.
- Along with the rods, you'll need styling cream or foaming mousse for hold.
- Bobby pins to secure each roll.
- A light mist of conditioning spray for softness.
Step 2: Apply Foaming Mousse
When it comes to styling tight curly hair with flexi rods, it's crucial to consider the benefits of using defining products. Not only can they help you save time when it comes to curling, but they can also help keep those beautiful curls locked in place longer.

To even further enhance your curls, consider adding extra hold in the form of foaming mousse. You should apply this after your hair is damp. However, make sure not to use too much, as it might weigh down your hair's volume and make the curls look less lively.
Step 3: Wrap Your Hair Around the Flexi Rod
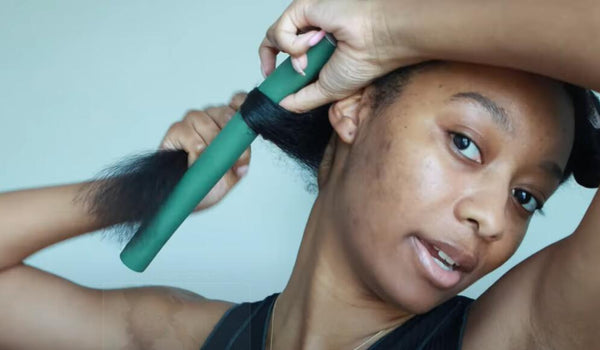
- Start by taking each strand of hair and wrapping it around the flexi rod starting from the ends.
- When you reach the roots of the strands, take both ends of the flexi rod and bend them towards each other to secure them.
- For a style that will be sure to retain style and body for the whole day, apply foaming mousse to every end of the strands for extra hold.
- Each flexi rod gives you that long-lasting curl look that can't be beaten. Furthermore, you are sure to retain a beautiful end look whichever flexi rods you opt for.
Step 4: Remove the Rods

It's been approximately one hour since the rods were in place, and now it's time to carefully remove them; this is done by gently unbending them and moving them in a reversal motion.
You can then use your fingers to delicately comb through your curls. This helps your style look more natural and boosts volume, texture, and definition.
Finish the look with a glossy, lush layer of a sprayed or oil-based serum; this will add further definition while providing a beautiful, sparkling shine across your locks.
Step 5: Final Touch!
To ensure that your curls last all day, we recommend spritzing on a setting spray for added hold and longevity. Now you have bouncy, defined curls that are sure to turn heads! And with a little practice, you can become an expert at curling your hair with flexi rods.
Leave a comment