


Comment obtenir la perruque idéale et mettre un bonnet de perruque
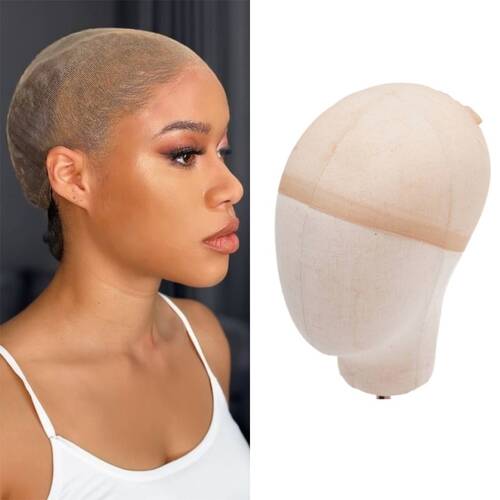
Le bonnet de perruque est une matière fine et élastique qui recouvre vos cheveux ou votre cuir chevelu et offre une base lisse à votre perruque. Nombreuses sont les personnes qui considèrent le bonnet comme un accessoire discret qui améliore le confort et l'aspect naturel de la perruque. Alors, si vous n'avez jamais porté de bonnet de perruque, c'est parti ! Suivez nos instructions étape par étape et nos conseils d'experts pour un résultat impeccable !
L'importance du port d'un bonnet de perruque
Le port d'un bonnet de perruque peut sembler facultatif, mais il peut faire une grande différence quant à la tenue, au confort et à l'apparence de votre perruque. Voici les principales raisons pour lesquelles le port d'un bonnet de perruque est fortement recommandé :
👉 Protège vos cheveux naturels : Un bonnet de perruque maintient vos cheveux en place, empêchant les mèches rebelles de dépasser ou de se glisser sous la perruque.
👉 Crée une base lisse : Elle aplatit vos cheveux pour créer une surface uniforme sur laquelle votre perruque pourra se poser, ce qui contribue à donner un aspect plus naturel à la coiffure.
👉 Améliore le confort : Les bonnets de perruque font office de barrière entre votre cuir chevelu et la perruque, réduisant les frottements et contribuant à éviter les irritations.
👉 Améliore l'adhérence : Le bonnet offre une friction supplémentaire qui aide à maintenir votre perruque en place tout au long de la journée.
👉 Protège votre perruque : Elle minimise la quantité de transpiration et de sébum qui atteint votre perruque, l'aidant ainsi à rester propre et à durer plus longtemps.
Que vous ayez une chevelure abondante, des cheveux clairsemés sur les tempes ou un crâne rasé, un bonnet de perruque peut améliorer votre expérience globale du port de perruque.
Guide étape par étape pour mettre un bonnet de perruque
Bien que porter un bonnet de perruque puisse paraître difficile au début, vous y parviendrez rapidement en vous préparant à l'avance et en suivant quelques conseils utiles. Vous trouverez ci-dessous un guide complet pour vous aider à démarrer. N'hésitez pas à le suivre et à l'adapter à votre convenance et à la longueur de vos cheveux.
Les outils dont vous avez besoin
✅ Bonnet de perruque
✅ Peigne ou brosse à dents larges
✅ Épingles à cheveux
✅ Élastiques à cheveux
✅ Laque (facultatif)
✅ Spray hydratant ou protecteur pour le cuir chevelu (facultatif)
✅ Spray adhésif pour perruque (facultatif)
Étape 1 : Choisir le bon bonnet de perruque
Choisissez un bonnet de perruque qui s'harmonise avec la couleur de votre perruque ou votre teint et qui soit confortable. Les bonnets de perruque existent en de nombreuses couleurs (nude, marron, noir, etc.) et matières (comme le bambou respirant ou le nylon fin). Je choisis toujours un bonnet dont la couleur se rapproche le plus de ma carnation ou de celle des racines de ma perruque. Ainsi, un léger mouvement du bonnet sera moins visible.
Un bon ajustement est essentiel au confort. Assurez-vous donc que le bonnet ne soit ni trop serré ni trop lâche : il doit s’étirer pour couvrir votre tête sans la pincer. Si vous avez une tête plus large ou des cheveux épais, choisissez un bonnet de grande taille pour plus d’aisance.
Étape 2 : Préparez vos cheveux (et votre cuir chevelu)
Avant de mettre le bonnet, rassemblez et aplatissez vos cheveux autant que possible. Si vous n'avez pas de cheveux (ou des cheveux très courts), vous pouvez passer à l'étape suivante. Sinon, commencez par peigner ou brosser vos cheveux vers l'arrière, en les éloignant de votre visage. Ensuite, aplatissez-les.
✨ Méthode des tresses africaines
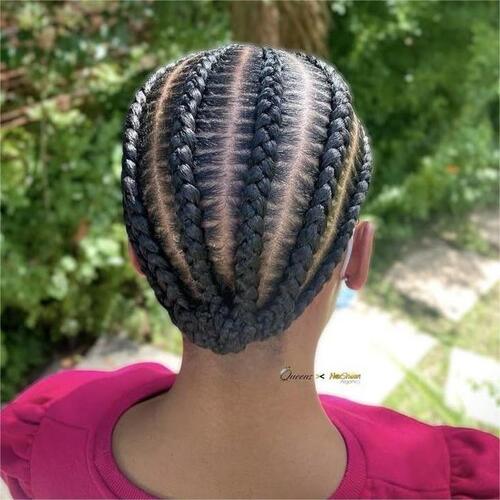
Pour les cheveux longs, vous pouvez les séparer en plusieurs sections et tresser chaque section près du cuir chevelu (style tresses collées) afin de réduire le volume. Plus vous ferez de tresses, et plus elles seront fines, plus les tresses collées seront plates. Bien sûr, vous pouvez également appliquer un spray démêlant pour éviter les nœuds pendant le tressage.
✨ Méthode de tressage
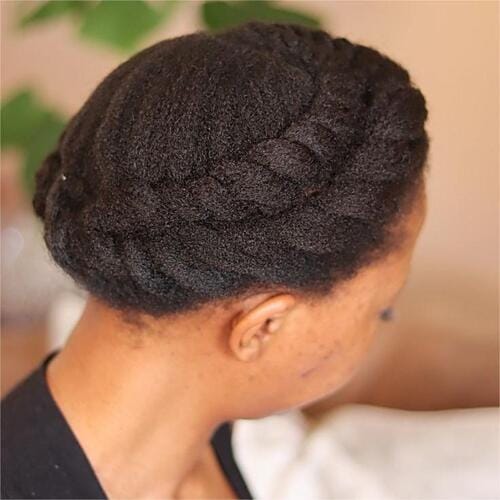
Vous pouvez enrouler les tresses autour de votre tête et expérimenter différents styles. Commencez par tresser chaque côté de vos cheveux séparément après les avoir séparés en deux parties égales. Une fois le tressage terminé, maintenez-les en place en les croisant à l'arrière de votre tête. Veillez également à ce que les tresses sous le bonnet de perruque ne soient pas trop serrées, car elles risqueraient de tirer sur vos cheveux au niveau de la racine.
Méthode Bun
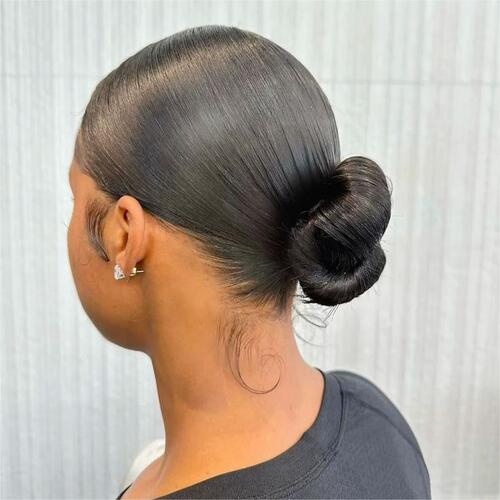
Rien de mieux qu'un chignon pour vos cheveux courts, surtout s'ils arrivent aux épaules ou plus bas. Vous pouvez ensuite les fixer avec des épingles après avoir rassemblé tous vos cheveux en un chignon bas et serré à l'arrière de la tête. N'hésitez pas à utiliser de la laque pour maintenir en place les petits cheveux rebelles et les mèches courtes qui ont tendance à s'échapper du chignon.
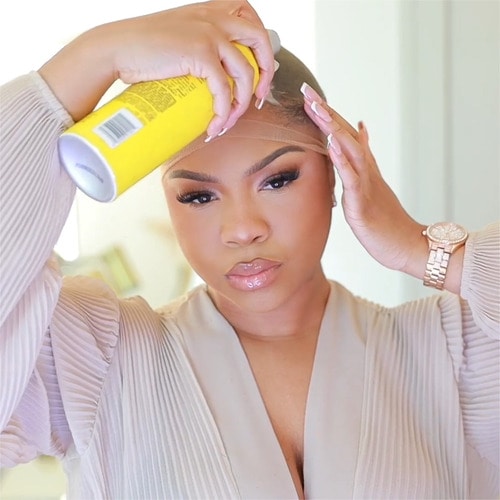
Conseil : Si votre cuir chevelu est sensible ou si vous souhaitez plus de confort, appliquez une petite quantité de spray protecteur ou même de crème hydratante. Cela facilitera l’enfilage du bonnet et atténuera les irritations. Personnellement, je vaporise rapidement le produit sur mon cuir chevelu et j’attends qu’il sèche avant de porter le bonnet. Bien que ce ne soit pas indispensable, cela rend le port du bonnet – et par la suite de la perruque – plus agréable, surtout par temps chaud.
Étape 3 : Mettre et aligner le bonnet de perruque
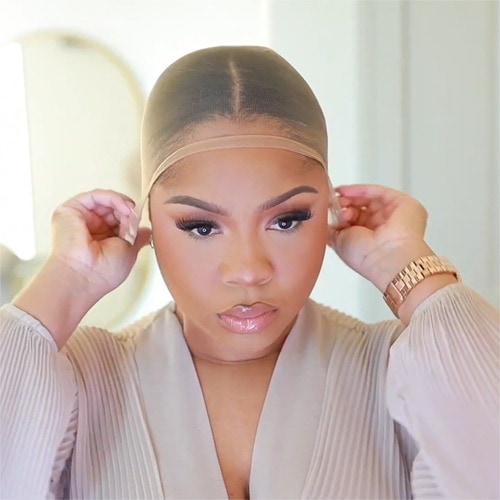
Tenez le bonnet de perruque par le bord et repérez le devant (certains bonnets ont une légère courbure ou une ouverture plus large à l'avant). Enfilez le bonnet par-dessus votre tête, de l'avant vers l'arrière, comme un bonnet de bain. Commencez par le front et tirez-le vers l'arrière de votre tête. Ce faisant, veillez à bien l'aligner avec votre ligne de cheveux naturelle. Pour la plupart des gens, le bonnet se positionne juste devant la ligne de cheveux, puis il faut le tirer vers l'arrière afin qu'aucun cheveu naturel ne dépasse à l'avant. Ce positionnement vous donnera une ligne de cheveux naturelle une fois votre perruque portée.
Si votre ligne de cheveux est irrégulière (par exemple, si vous avez un pic de veuve ou quelques zones plus hautes), ne vous inquiétez pas : visez à couvrir le point le plus bas ou le plus éloigné de votre ligne de cheveux.
Étape 4 : Rentrez les cheveux rebelles et ajustez
Une fois le bonnet en place, vérifiez qu'aucun cheveu ne dépasse. Utilisez vos doigts ou un peigne fin pour le glisser délicatement sous le bonnet. Je vérifie toujours les contours, surtout au niveau des tempes et de la nuque, et je rentre les mèches rebelles.
Ensuite, prenez un instant pour lisser le bonnet afin qu'il épouse parfaitement votre tête. Si vous sentez une surépaisseur à un endroit, ajustez les tresses ou les épingles à cheveux en dessous jusqu'à obtenir une chevelure uniforme.
Étape 5 : Fixez le bonnet de perruque
Une fois la coiffe bien alignée et tous les cheveux rentrés, il faut éviter qu'elle ne bouge.
La solution la plus simple est d'utiliser des épingles à cheveux. Je prends généralement quelques épingles à cheveux solides et je les glisse sur les bords du bonnet à des endroits stratégiques : par exemple, une sur chaque tempe et deux ou trois près de la nuque. C’est rapide et indolore, et je trouve que ça maintient le bonnet bien en place sans le serrer.
Pour une meilleure adhérence, vous pouvez appliquer une colle en spray légère sur les bords du bonnet. Si vous souhaitez une meilleure tenue, utilisez-en très petite quantité : soulevez le bord du bonnet, déposez une goutte de colle à l’endroit où il est en contact avec votre peau, puis appuyez fermement sur le bonnet. Bien que cette méthode doive être utilisée avec précaution, elle peut empêcher le bonnet (et la perruque) de bouger. Pour éviter toute irritation, testez toujours la colle sur une petite zone de peau au préalable.
Votre bonnet de perruque devrait maintenant être parfaitement positionné. Vos cheveux sont bien maintenus, le bonnet est en place et votre cuir chevelu est lisse. Grâce à cette base solide, vous pouvez maintenant poser votre perruque.
Conclusion
Pour toute personne portant une perruque, la pose d'un bonnet est une étape simple mais essentielle. En choisissant le bonnet adapté, en préparant vos cheveux et en suivant les instructions précédentes, vous obtiendrez une base lisse et stable qui mettra en valeur votre perruque. J'ai appris à de nombreuses clientes qu'avec la pratique, porter un bonnet devient un réflexe, ce qui vous permettra d'affirmer votre coiffure avec assurance. Grâce à ces conseils, nous espérons que vous aurez envie d'intégrer le bonnet à votre routine capillaire. Vous êtes maintenant prête à arborer votre nouveau style ! Alors, n'hésitez plus et sublimez-le avec votre perruque UNice préférée !
Laissez un commentaire